When you insert a new storage drive in your windows device, it will automatically assign a letter to it. However, when there are multiple storage devices connected at the same time, the letter can sometimes feel ambiguous as there is no easy way to manage them. So, it might be a good idea to change drive letter on windows 10/11 for easier storage management. But how exactly do you change the drive letters on Windows 10/11? We will answer that question and also offer a bonus tip for better storage management.
Why Do I Need to Change Drive Letter in Windows 10/11?
Changing drive letters in Windows 10 can be helpful in various situations. Here are some reasons why you might need to change the drive letter on your computer:
- Resolve drive letter issues. Your computer could assign a new drive a drive letter that is already in use. This can create conflicts and failures, especially if you try to access the disk or run programs that depend on it. These problems can sometimes be resolved by altering the drive letter.
- Improve drive organization: changing the drive letters can keep your drives organized and make it simpler to find the one you need. This will assist you if you have numerous drives. For instance, you may give letters like H, I, J, etc. to all of your hard drives that are identical to one another.
- Match drive letters with programs or scripts: Some programs or scripts may demand that the drive letter be set to a particular letter. You might need to change the drive letter if it does not match the requirements of the application or script.
- Reassign letters for new or replaced drives: If you add a new drive or replace an existing one, you may need to change the drive letter so that it is recognized by the system. This can be especially important if the new drive has important data that you need to access.
How to Change Drive Letter in Windows 11/10?
Now that we have listed all the possible reasons on why you should change the drive letter in windows, let us now focus our attention on the steps we can take to change it. There are several ways that you can try, we listed them all so that you can try one you find easiest to follow.
Way 1. Via Disk Management
The most well-known workaround to change drive letters in windows 11/10 is through using the “Disk Management” tool. To get started, follow the steps below:
- Step 1: Click on the start menu and search “Disk Management”.
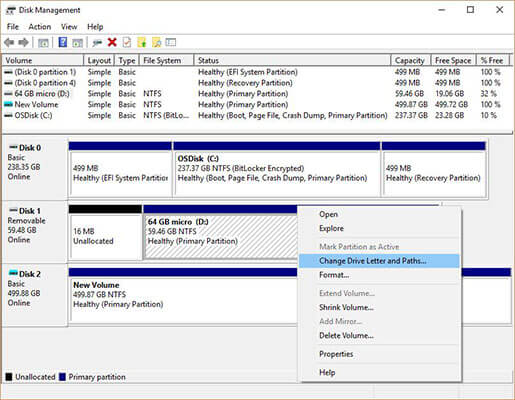
- Step 2: Once “Disk Management” is opened, select and hold the drive you want to change the letter and then select the “Change Drive Letter and Paths” option.
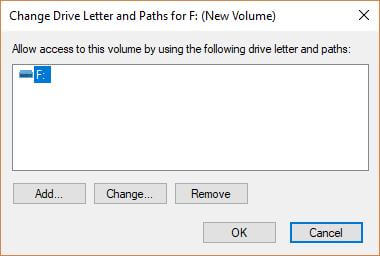
- Step 3: Now tap on the change and add a new letter that was not previously added.
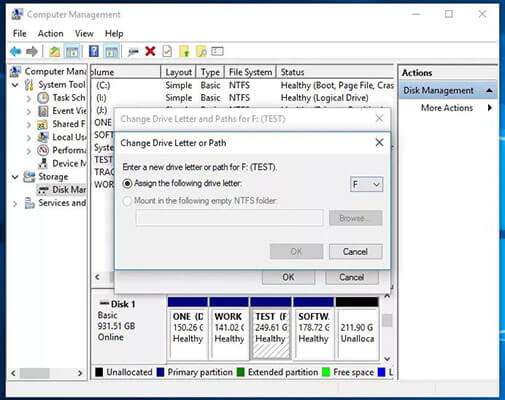
- Step 4: And finally, tap on “Ok” and when prompted that “other programs relying on this drive may not work properly”, select “Yes”.
As you can tell already, changing drive letters may result in other programs to work properly so make sure you are certain that the drive you are changing the name has no dependencies with other files in your computer.
Way 2. Via CMD / Diskpart Command
If visual Disk Management is not your thing, you can use the conventional Command Prompt method to change the drive letter in windows 10/11. A detailed guide is provided below:
- Step 1: Tap on the “Start” menu from the bottom left of the screen and search “Command Prompt”.
- Step 2: Open the Command Prompt in as administrator by right-clicking the option and selecting “Run as administrator”.
- Step 3: In the command prompt type “diskpart” and hit enter.
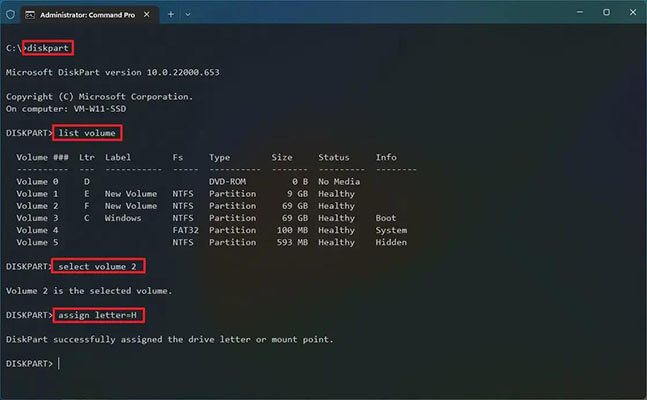
- Step 4: Now to see all the “Volumes” or storage devices in your computer type “list volume”.
- Step 5: Next, select the volume for which you want to change the letter, for example, you want to change the second volume so type “select volume 2” and hit enter.
- Step 6: And finally assign a new letter to your drive by typing “assign letter=H”, you can assign any unused letter.
Way 3. Via Windows PowerShell
Similar to the “Command Prompt”, you can also use Windows PowerShell to change drive letters in Windows 10/11. Use the steps below to guide you in the process.
- Step 1: Similar to the command prompt, tap on the “Start” menu from the bottom left of the screen and search “Windows Powershell”.
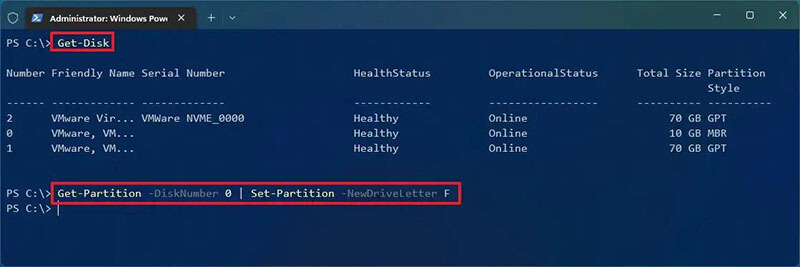
- Step 2: Now, once the PowerShell is opened you can identify the hard disk by typing “Get-Disk” in the search box.
-
Step 3: Now type the following command and hit enter.
“Get-Partition -DiskNumber 0 | Set-Partition -NewDriveLetter F”
The number 0 denotes the drive and the letter will be used to replace the drive. So in our example, the drive name will be changed to “F”.
Way 4. Via Settings
And finally, if you do not want to type in codes and prefer a more traditional approach, here is how you can change the drive letter using the settings.
- Step 1: Click the start menu and tap on the setting.
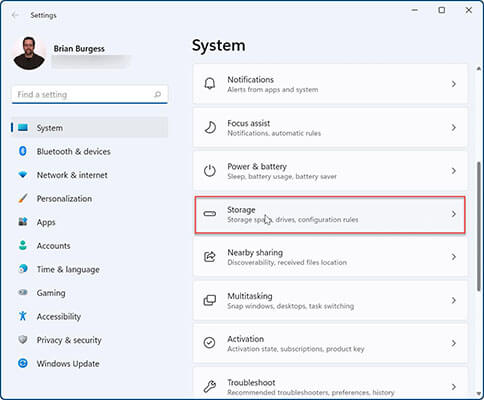
- Step 2: Now, navigate to System > Storage and then scroll down to find the “Advanced storage settings” option.
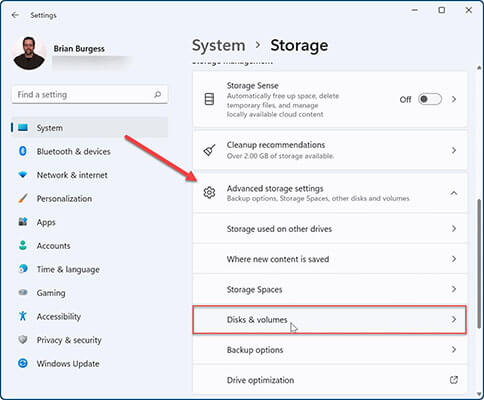
- Step 3: Now, you will find the “Disks & volumes” section, tap on it to expand.
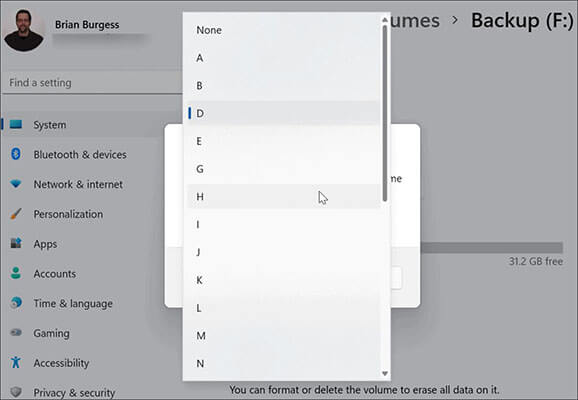
- Step 4: Now click on “Properties” and click on “Change Drive Letter” under the volume section.
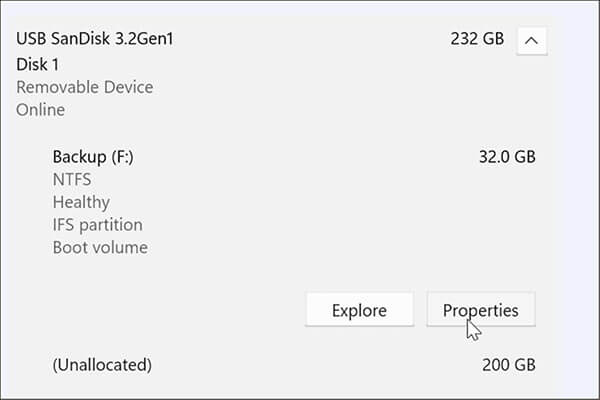
- Step 5: A new window will pop up with a drop-down menu. You can select any letter from this menu and it will be assigned as the new letter.
Why Cannot I Change Drive Letter in Windows 10/11?
In general, you can change drive letter. But you may not change drive letter sucessfully from time to time. There can be several reasons why you cannot change the drive letter in Windows 10/11. Some of them are listed below.
The drive is already in use: You cannot change the drive letter if it’s currently in use by a program or the operating system. So when trying to rename a letter, make sure to stop all its activity first.
The drive letter is reserved: Some drive letters are reserved for specific purposes in Windows and cannot be changed, such as “C” for the primary system drive and “A” and “B” for external drives.
Disk Management error: If you are using Disk Management to change the drive letter and it fails, it could be due to a bug or issue within the disk management.
Permission issues: If you do not have administrative permissions, you will not be able to change the drive letter.
Virus or malware: If your computer is infected with a virus or malware, functionality within the computer may be restricted resulting in you not being able to change the drive name.
How to Recover Data After Changing Drive Letter in Windows 10?
Changing letters in Windows 10 can sometimes result in runtime errors causing other programs not to work properly. In some extreme cases, changing letters can even cause data loss which may lead to even bigger problems.
Now, we understand the importance of personal data, and losing them is never a good experience. So, here is a bonus tip to help you recover any lost data from your computer in three simple steps.
Free DownloadSecure Download
- Step 1: Download and install the StarzSoft Data Recovery app which is a utility tool that can recover any lost or deleted data from your computer or any external drive.
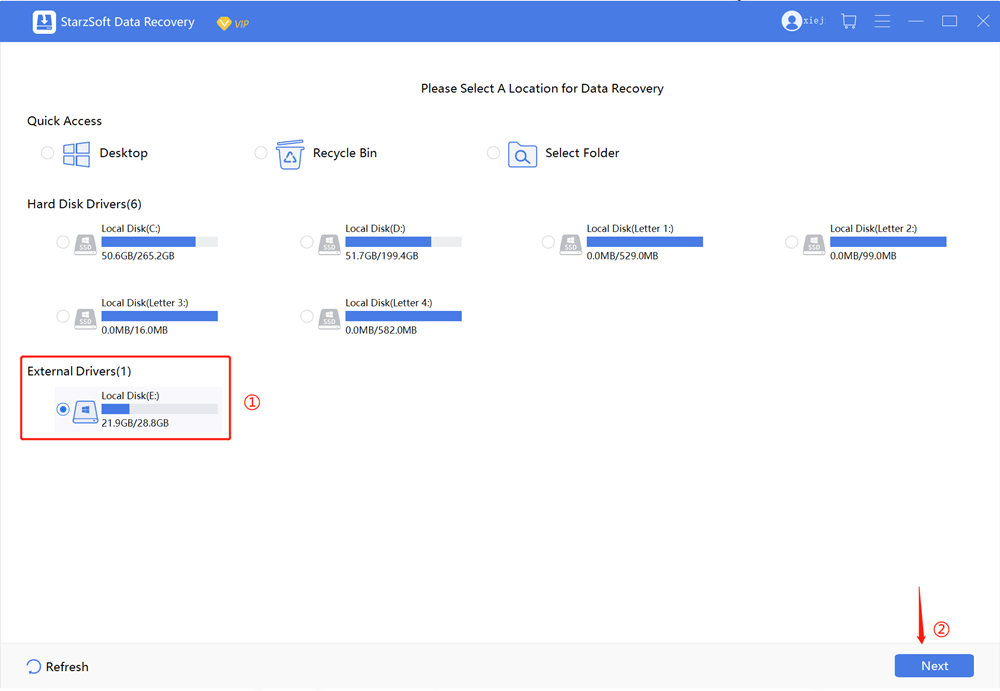
- Step 2: Launch the app and select the drive from which you want to recover the data and hit next.
- Step 3: Now the Starzsoft Data Recovery tool will scan the selected drive and you can preview all the files that were lost or deleted once the process is done. You can select the files you want to recover and tap the recover button on the button right.
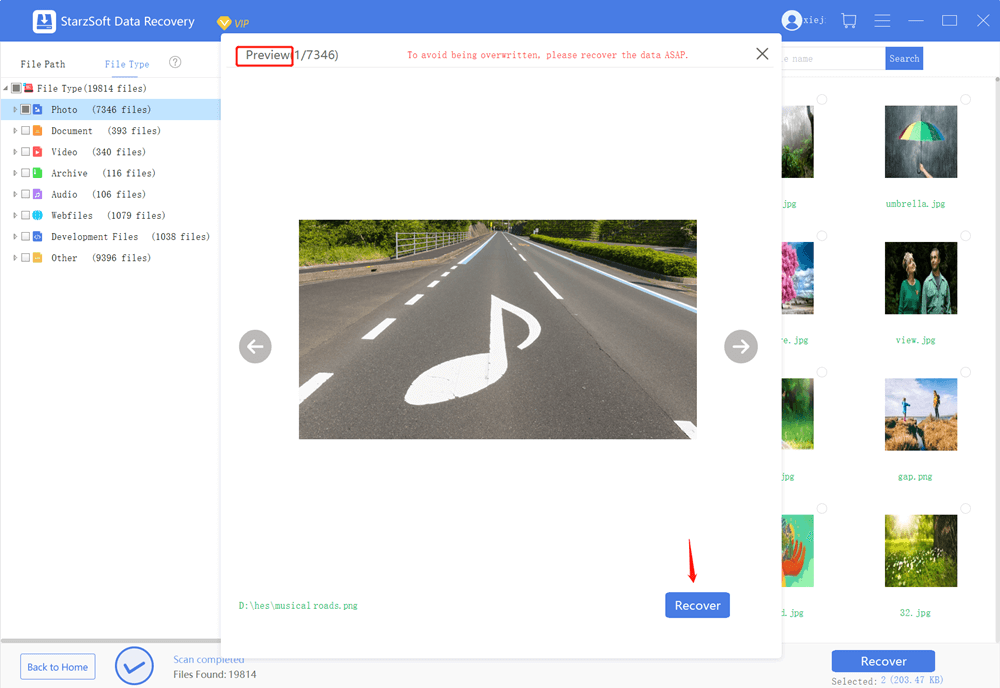
And that’s it, in these three simple steps, all your data will now be recovered. Starzsoft Data Recovery is one of the highest success rates tools in recovering lost data and can help you recover data at a blazing-fast speed. So, if you ever wanted to recover some deleted files, give Starzsoft a try.
Final Words
Windows 10/11 comes with a plethora of features that allows managing drivers a lot easier. You can use any of the above methods to change the drive letter on windows 10/11 and as long as the drive does not have any dependencies with other programs, it should not result in any error. However, it does not mean you will not meet any problem. If you cannot change the Driver letter, you can follow the reasons we provided to fix it. You may also experience data loss which needs to be recovered using utility tools like StarzSoft Data Recovery app. Follow the above guide to recover them with simple clicks.
Free DownloadSecure Download
