Besides knowing about installing Windows 10, hundreds of users also ask about the minimum or maximum requirements for Windows 10. Looking for fast and wonderful hardware is crucial to make the PC run faster and smoother.
Hence, if you don’t know about the minimum required for Windows 10 or want to know about the minimum requirements for Windows 10, dive into this breathtaking guide.
Part 1. The Minimum Required for Windows 10
When acquiring the PC, you might have wanted to install Windows 10 as it is one of the ways to make the computer work better.
Only opting for Windows 10 isn’t enough; you’ll need to ensure that Windows supports your selected hardware. It implies that you’ll need to fulfill minimum system requirements for Windows 10.
Here’s the list of minimum hardware requirements for Windows 10.
- RAM 1 GB 32 BIT
- 1 GHz processor
- 16 GB hard disk space requirements on 32 bit system
- Microsoft DirectX 9 Graphics card with WDDM driver
Part 2. What are the Best Requirements for Windows 10?
Opting for the minimum required Windows 10 is fine as it will help you run the computer system. However, if you want to make the computer unstoppable while using Windows 10, you must opt for the best system requirements for Windows 10.
Here’s the hardware system requirements list to make your computer run faster.
- 2GB RAM coupled with 64 bit OS
- 3 GHz processor
- 20 GB hard disk space with 64 bit OS
- Microsoft DirectX 9 Graphics card with installing the WDDM driver
Part 3. What are the Minimum Requirements for Windows 11?
If you’ve shifted to Windows 11 and want to know about the best system requirements for Windows 11, watch out for the system requirements below.
- 1 GHz processor
- 4 GB RAM
- 64 Hard Disk space
- DirectX 12 Graphics card with WDDM 2.0 driver
Extra Tips for Windows PC
Tips 1. How to Make Windows More Smoothly
1. Turn off Visual Effects
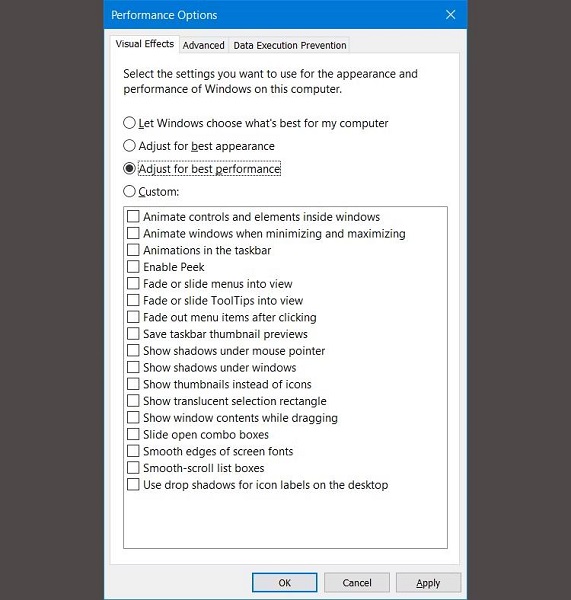
The Visual effects on the computer might slow it, so turning off all the visual effects might help you improve the computer’s performance. Here’s how to turn off the Visual Effects.
- 1. Tap on the Advanced system settings after hitting the System icon.
- 2. Select the Advanced icon and select the Settings icon under the Performance option. Left-click on the adjust for best performance radio button to turn off all visual effects.
2. Speed Up the Processor
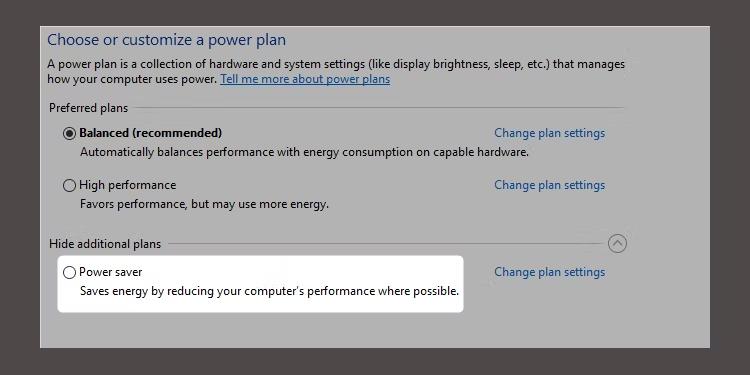
Windows has three default settings to show you the processor’s performance. The three settings include the Power Saver, Balanced, and High Performance. You can use the Power and Balanced Saver plans to improve the processor’s performance if you’re a laptop user.
Windows PC users must opt for the High Performance as it lets you get the processor up and running without any issues. You can also tinker with the Processor settings by visiting the Power Options.
3. Disable Auto Starting Programs
When you install software, it will run in the background, making the PC slower. Hence, if you intend to make the computer run faster and more stable, you must turn off the auto-starting programs in the first place.
Follow the guide below to turn off auto starting programs.
- 1. Enter into the Windows Task Manager by pressing Ctrl+Shift+ESC.
- 2. Navigate to the top of your screen and choose the Startup icon.
- 3. After visiting the Startup, you can turn off all the auto starting applications.
4. Check the Internet Connection
One of the biggest reasons behind the Windows PC running slower and loading the pages after taking a whole isn’t a provider but your internet connection.
If you aren’t using a fast or stable network, you won’t be able to perform multiple tasks on the PC. This way, you might blame the PC’s performance, but checking out the internet connection speed is more important here. Hence, you’ll need to ensure that your internet has a higher bandwidth.
5. Set the Internet Connection to Metered
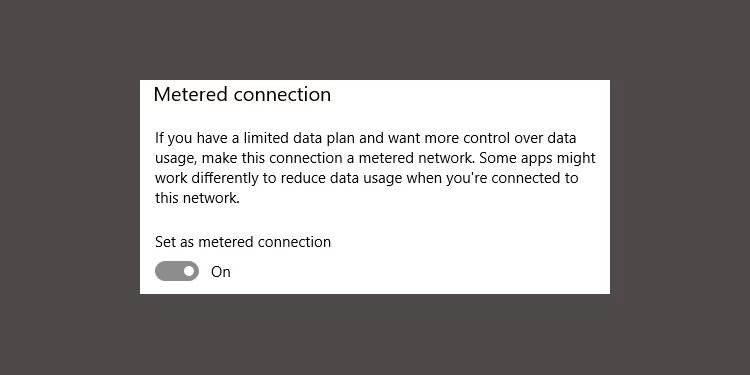
If you’re using a WiFi connection with limited bandwidth, updating the Windows will significantly impact the computer’s performance. You can avoid getting affected by setting the connection to the metered. Doing so allows you to maintain the internet connection speed on your computer.
- 1. Launch the Windows settings through Windows Key+I.
- 2. Click the WiFi button after hitting the Network & Internet icon.
- 3. Choose the network you’ve been connected to and click Set as metered. You can turn this option on to put things in order.
6. Turn off the Windows 10 Search Indexing Features
Upon searching for a file, Windows doesn’t necessarily scan every directory on the computer, provided you’ve enabled the indexing. It is a way to create the stored files’ text manifest on the PC, improving the file search speed. Thus, turning off the indexing will improve the performance of your computer by slowing down the searches.
Turning off the indexing isn’t recommended in the new computers, but if you’re using the older model, follow the guide below to turn off the indexing.
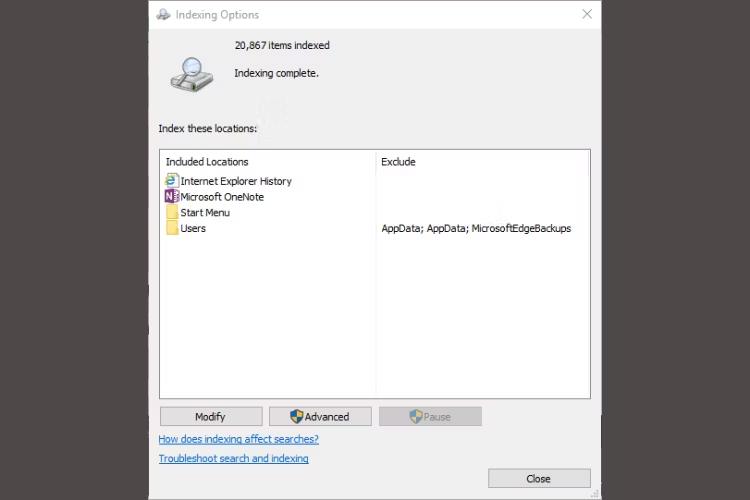
- 1. Navigate to the Windows search tool and type the Index there. Tap on the Indexing options to start the preceding.
- 2. Left-click the Modify button before unchecking all the boxes out there.
Tips 2. How to Recover Lost Data on Windows PC
You perform multiple operations on the computer daily. Unfortunately, you might lose important data while performing several tasks on the computer. The good thing is that you can retrieve the lost data courtesy of StarzSoft Data Recovery.
It is a highly efficient data recovery tool that simplifies retrieving data from multiple storage devices. Starzsoft Data Recovery doesn’t compromise data quality despite offering a simple and highly professional user interface. It allows you to retrieve it in its original quality.
Free DownloadSecure Download
- 1. To start with, you’ll need to visit the official website of the Starzsoft Data Recovery software and click on the Install icon to get it installed. Next, you’ll need to start the program to begin proceedings.
- 2. In this phase, you’ll need the folders from which you’ve lost the files. Next, press the Next button to let the Starzsoft Data Recovery software scan your data.
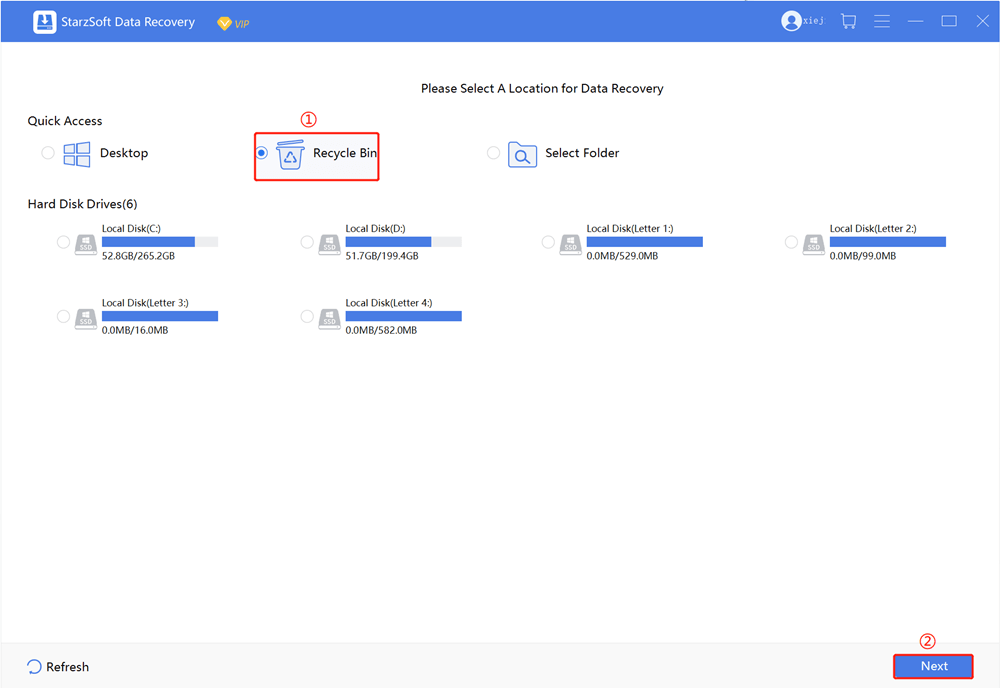
- 3. Tap on the Preview button to review the data, and you can now select the files you’d like to keep. After selecting the type of data you’d like to get back, press the Recover icon to start recovering the data.

Conclusion
This post has listed the minimum required for Windows 10. Apart from helping you to know about the minimum requirements for Windows 10, we’ve also highlighted the best requirements for Windows. You can also learn about the minimum requirements for Windows after reading this inspirational guide.
We have recommended the StarzSoft Data Recovery software to help you retrieve lost data from your Windows PC without affecting the data quality.
Free DownloadSecure Download
