If you recently purchased a new m.2 SSD, inserted it in your motherboard, and your BIOS isn’t recognising it. You might have tried detaching my other SATA drives and updating your BIOS to the most recent version, but that didn’t help. It generally happens if you have a 500GB HDD for storage and a 120GB SSD for your operating system when using a gigabyte z170 hd3p motherboard.
M.2 SSD not being detected by BIOS is becoming common. Some consumers have recently changed their M2 hard drives, yet a terrible thing occurs: Windows fails to identify or recognise the M.2 disc. Here it is, this can be manually solved.
Part 1: Why is My M.2 SSD Not Showing Up in BIOS
Here are the possible reasons if your m.2 ssd not showing up in BIOS.
- Reason 1: If you’re here, it’s probably because Secure Boot or CSM problems are the reason NVMe isn’t showing up in the BIOS.
- Reason 2: An outdated disc management programme or poor drive configuration could also be to blame for the issue.
After you’ve been saving for your first M.2 SSD drive for such a long time, it may be frustrating that M.2 doesn’t appear in BIOS. Here are the fixes.
Part 2: How to Fix M.2 SSD Not Showing Up in BIOS
1. Configure Your M.2 SSD
- 1. Depending on the manufacturer of your motherboard, switch on your computer and hit the F or DEL keys to access BIOS. Depending on your motherboard, a separate key may be required.
- 2. Go to Storage Configuration next.
- 3. Click Configure SATA as under SATA Configuration.
- 4. Next, select IDE by pressing the Enter key.
- 5. Pick IDE over SATA.
- 6. To quit and preserve your modified BIOS changes, press F10.
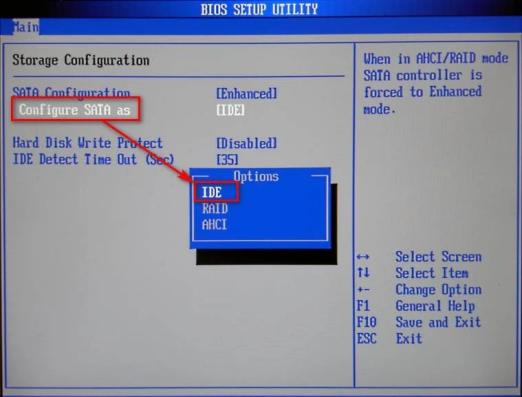
Your m 2 ssd drive might not appear if the BIOS setting for your SATA drive is set to something other than IDE.
2. Disable Secure Boot
- 1. Restart your computer, then enter BIOS by pressing the key designated for your motherboard.
- 2. After that, select Secure Boot under the Security tab.
- 3. Disabled can be chosen from the menu.
- 4. Turn off Secure Boot.
- 5. After that, navigate to the Save & quit tab.
- 6. After that, navigate to the Save & quit tab.
- 7. Return to the Security tab.
- 8. Select Yes, then select Delete all secure boot variables. Delete each and every Secure Boot variable.
- 9. Choose OK to restart your computer.
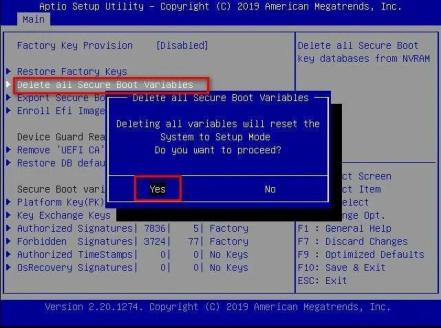
3. Set PCIe Setting to M.2
- 1. To access BIOS, restart your computer and press the key that corresponds to your motherboard.
- 2. Choosing Advanced Settings You may also hit F7 on some motherboards to reach the menu.
- 3. Then look for PCI Express slot Bandwidth under Onboard Devices Configuration.
- 4. Then, if its value is not already set, set it to M.2 mode.
- 5. Change PCIe to M.2.
- 6. To save the changes and leave, press F10.
- 7. One of the simplest and most efficient solutions to fix the NVMe not displaying in the BIOS issue is to set PCIe to M.2.
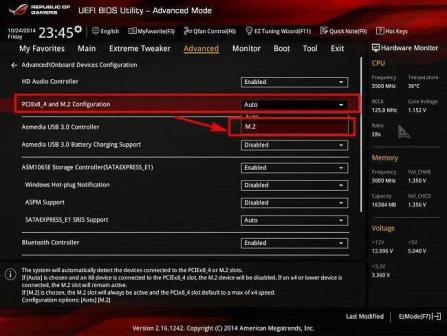
4. Change Boot Priority to M.2
- 1. Reboot your computer. To restart, click the power icon after pressing the Windows key. Ensure that all running apps are closed in order for the computer to close down.
- 2. When you see the startup window, press the startup key. In most cases, you’ll need to use either the F1 or F2 key, though this may differ depending on the maker of your PC.
- 3. Whenever prompted, choose Enter Setup. The Enter key and keyboard keys must be used to traverse the menus on these systems because they occasionally do not support mouse input.
- 4. Use your arrow keys to get to the Boot tab. At the bottom of the screen, there is a legend that instructs you on which keys to press to do certain actions.
- 5. To move things on the boot menu screen, press + or -. You’ll see a list of the things that are prioritised during boot. Currently, M.2 can be moved to the top of the list. To restore the default settings, press F9.
- 6. Click F10. The BIOS menu will be saved and then closed. Before this process is over, you will then click Yes.
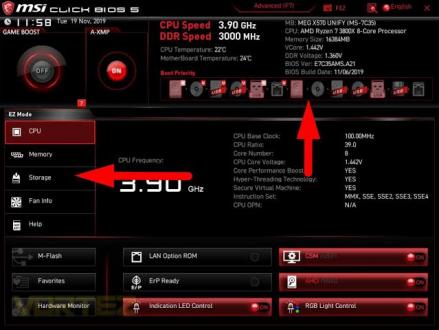
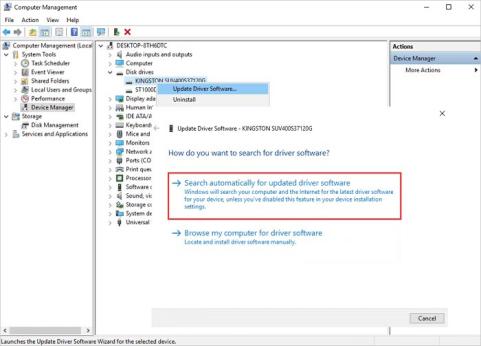
5. Update M.2 Diver
- 1. Click “Device Manager” while pressing “Windows + X.”
- 2. Boost the disc drives.
- 3. Select “Update Driver Software” from the context menu of the M.2 SSD.
- 4. Select “Search automatically for updated driver software” from the update driver software window.
- 5. After the update is finished, restart your computer to check if the issue is solved.
6. Assign a New Drive Letter to the M.2
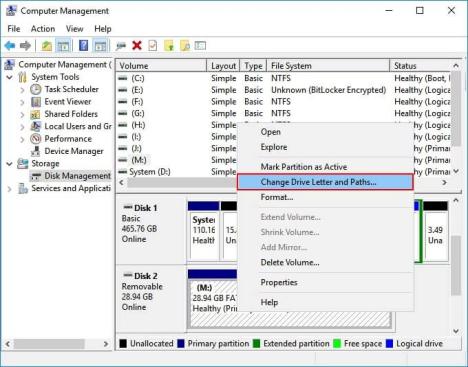
- 1. Activate Disk Management.
- 2. Change the Drive Letter and Paths option by right-clicking your SSD.
Part 3: How to Recover Data When M.2 SSD Not Showing Up Using Data Recovery Tool
The next step is to recover your data using a data recovery programme, such as StarzSoft Data Recovery, if the aforementioned fixes for M.2 SSD not being detected in Windows 10/11 do not work. Otherwise, you won’t be able to access your important info.
The powerful hard disc recovery programme StarzSoft Data Recovery can recover data from damaged, inoperable, and RAW hard discs. Use these 3 easy steps after downloading the data recovery tool:
Free DownloadSecure Download
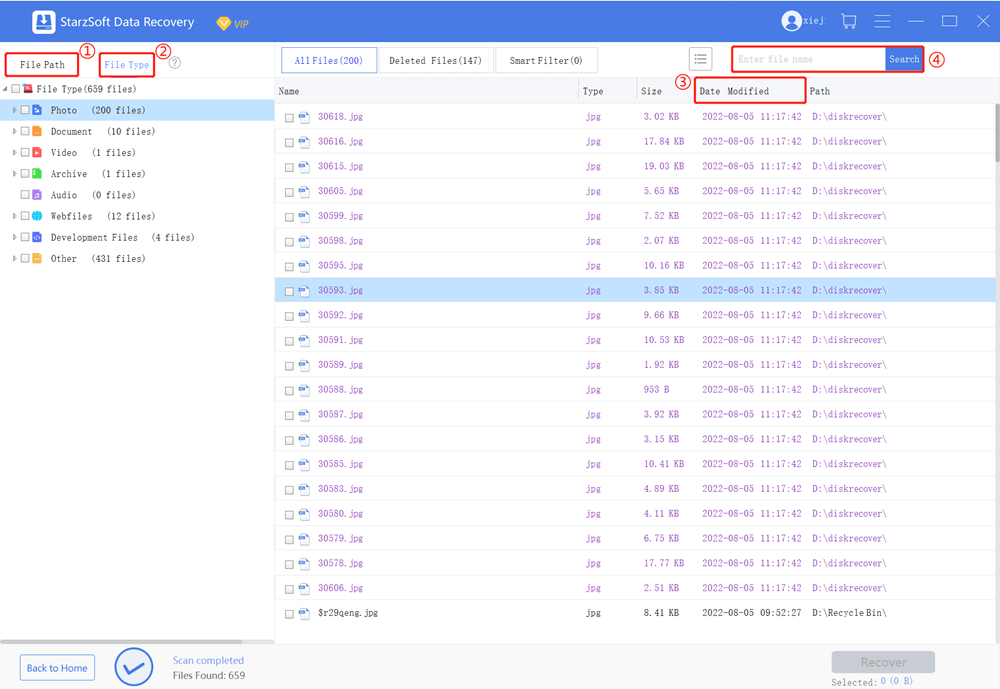
- 1. Open the StarzSoft Data Recovery, choose the SSD from which you lost your data, and then click “Next.”
- 2. After reviewing the “Deleted Files” and “Other Missing Files” folders, use the “Filter” and “Search” options to locate lost SSD data.
- 3. To recover deleted SSD files, choose the relevant data and press the “Recover” button.
Conclusion
A large number of people are now purchasing M.2 SSDs to utilize for storage and for booting. Additionally, it aids in accelerating computer performance. Therefore, it negates the original intent of buying it if the drive is unable to be recognised by Windows or does not appear in the BIOS boot priority and you remain worried about why is my m.2 ssd not showing up in BIOS.
We hope this post has helped you learn how to use M.2 on your computer as efficiently as possible. Additionally, be sure the drive you purchase will work with your PC.
Apart from that, we also hope StarzSoft Data Recovery can help you recover data from the M.2 SSD.
Free DownloadSecure Download
FAQs about M.2 SSD
What is m2 ssd?
A storage card that is placed internally and supports high performance and fast speed is called an M.2 SSD (Solid-State Drive). Typically, they are smaller than other SSDs, like mSATA. To prevent the insertion of a card connection into an incompatible socket, M.2 SSDs are keyed. They frequently employ the three keys B, M, and B+M.
How to enable m2 SSD in BIOS?
From one motherboard to the next, the procedure is somewhat different, but it goes something like this: Look for PCI Express Slot options under the Onboard Devices tab in the advanced settings. Most board manufacturers set it to Auto by default, but if you’re having problems, switch it to M. 2 mode.
How do I know if my SSD is recognized?
You can check to see if your SSD drive is displayed in the BIOS of your computer. Deactivate your computer. While pressing the F8 key on your keyboard, restart your computer. Your SSD drive will appear on your screen if your computer can identify it.
