Allowing you to draw attention to the important information, highlighting a PDF makes reviewing and digesting materials much easier. However, it is not always clear how to highlight a pdf. Fortunately, the instructions in this detailed guide will show you how to add highlights to all types of PDF files.
1. Why can’t I highlight my PDF?
It is not uncommon for PDF users to deal with the “PDF won’t let me highlight” issue. If you can’t select text in PDF, the reason could be one of the following:
- You are dealing with a scanned document.
- The PDF file is secured.
If the PDF file originates from a scanned piece of paper, then the reason you can’t select text in PDF is that there is no “text” to highlight or select. A scan is an image of the original piece of paper. If you are wondering how to enable highlighting in PDF originating from a scanned paper, you may need to work with a PDF tool that has the OCR (Optical Character Recognition) feature. The OCR feature will help you convert the image of the text in your scanned PDF into a highlightable/selectable text.
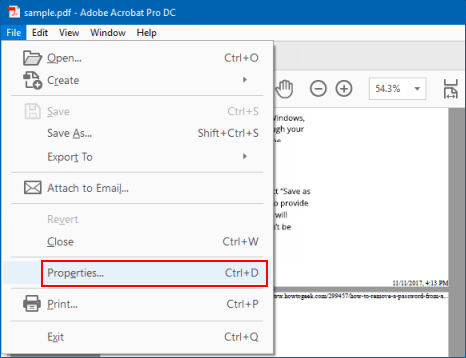
If your PDF file is not scanned but you still can’t select text in PDF, chances are, the file has security that prevents editing. You can’t highlight a secured PDF. If you are using Adobe Reader, you can check whether the document is secured by clicking on File > Properties and then select the Security tab.
2. Highlight PDF online
If you have access to an internet connection, highlighting a PDF document should be easy with online tools. Most of the tools are free – this makes them very appealing to most PDF users.
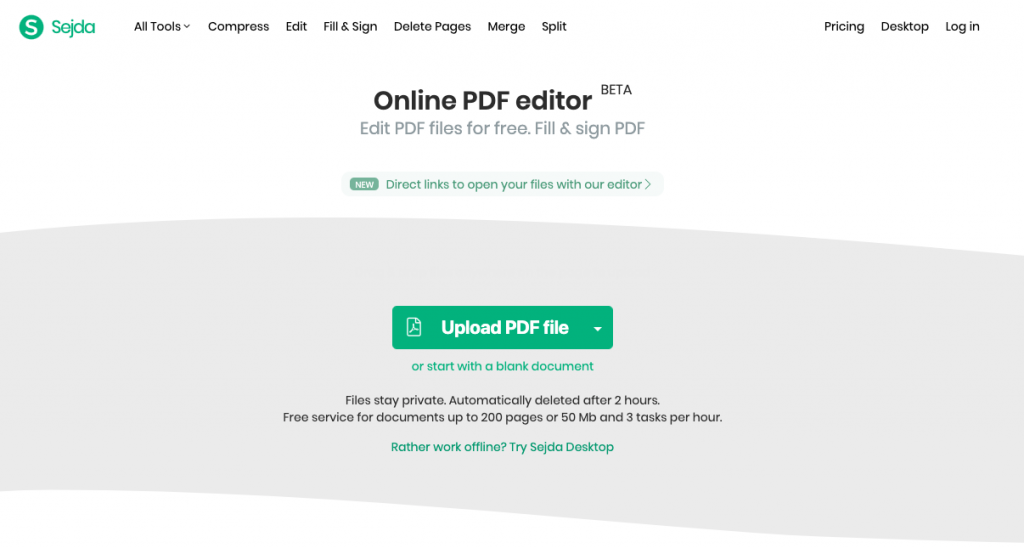
The online tool at Sejda.com makes highlighting PDF files extremely easy. The tool, however, limits their free service to documents up to 50 MB or 200 pages. Also, users are only allowed 3 tasks per hour when using the free service. Below, we will show you how to highlight a PDF using this online tool:
Step 1: Visit https://www.sejda.com/pdf-editor on your Mac or Windows computer.

Step 2: Drag and drop the document you would like to highlight. Alternatively, click the Upload PDF File button to select the document.
Note: If your PDF file is hosted online, you will need to click the dropdown arrow available to the right of the Upload PDF File button. Next, choose either Dropbox, Google Drive, OneDrive, or Web Address (URL) depending on where your document is stored.
Step 3: Once the file is uploaded, click the Annotate tab. From the sub-menu that appears, select Highlight and choose the color you would like to use.
Step 4: To highlight the text, simply drag the cursor over the text you would like to highlight.
Step 5: Once you are done, click the Apply Changes button at the bottom of the page and then wait for the online tool to finish processing your document.
Step 6: Click the Download bottom to get your highlighted PDF.
It is worth noting that most online tools have privacy issues, and once you upload your PDF document, you cannot control who can view it. For this reason, it is crucial that you only use online tools with documents that do not contain privacy issues.
3. How to highlight PDF on Windows 10 or earlier
On Windows 10
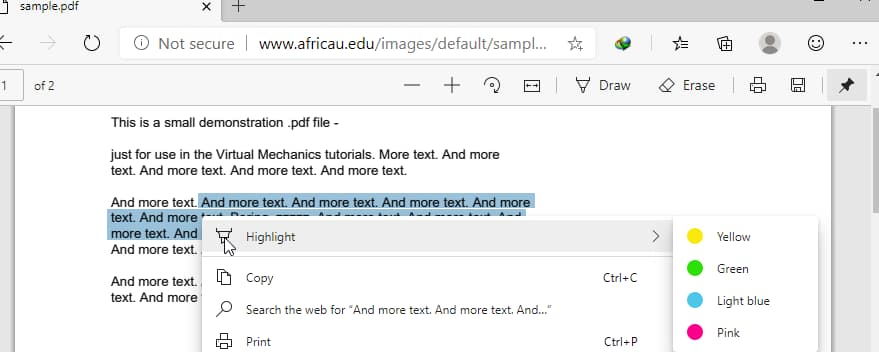
On Windows 10, the easiest way to highlight a PDF file is by making use of Microsoft Edge. This browser comes installed on the operating system and hence you won’t need to install it separately. Also, since Microsoft Edge operates 100% on your computer and does not involve uploading your document to third-party servers, it offers you complete privacy – you can use it with documents that contain private data.
Below, we will show you how to highlight a PDF on Windows 10, using Microsoft Edge:
Step 1: Locate the PDF document you would like to highlight. Right-click on it and choose Open With > Microsoft Edge.
Step 2: Once the file opens, select the text you would like to highlight.
Step 3: Right-click on the selected text, choose Highlight, and then select your preferred highlight color. This should highlight your document.

Step 4: To save the highlighted document, press Ctrl + S.
Earlier Versions of Windows
It is worth noting that Microsoft Edge is only available on Windows 10. To highlight PDF in other versions of Windows, you may need to use a third-party PDF reader. Adobe Reader is a free tool that you can use to highlight your PDF documents. Below, we will show you the steps you need to follow:
Step 1: Install Adobe Reader on your computer.
Step 2: Right-click on the PDF file you would like to highlight > choose Open With > select Adobe Reader.
Step 3: Once the document opens, select the highlighter tool – this will be the pen icon available on the right side of your toolbar at the top of Adobe Reader Window.
Step 4: Drag your cursor over the text you would like to highlight. This should highlight the text.
Step 5: Save your document by pressing Ctrl + S.
4. Highlight a specific word in PDF on Mac
To highlight a PDF file on Mac, you will simply need to use the Preview tool. This tool comes pre-installed on Mac computers. The steps below will show you how to highlight a PDF in Preview:
Step 1: Launch the Preview tool on your Mac computer. Click File > select the Open option to locate and open the PDF file you would like to highlight.
Step 2: Select the specific word(s) you would like to highlight with the cursor.
Step 3: Once the text is selected, click the highlighter icon at the top of the screen – the icon will have a pen on it. This should highlight the selected words automatically.
Step 4: To change the highlighting color, click the dropdown arrow to the right of the pen icon.

Step 5: Once you are done with the highlight, save the markup by going to File > Save.
5. Mark up texts in scanned PDF
As noted earlier, PDF files originating from scanned documents do not have selectable text. This is one of the reasons most people deal with the “PDF won’t let me highlight” problem. With the right tools, however, you can eliminate this problem. Below, we will show you how to enable highlighting in PDF formed through scanning.
Use OCR tool
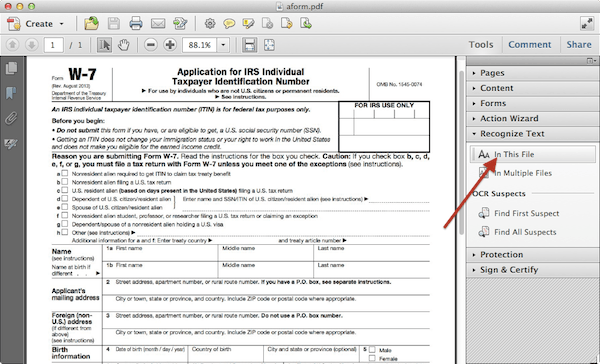
To use this option, you will need to have a tool with the Optical Character Recognition (OCR) feature installed on your computer. One such tool is Adobe Acrobat X. The instructions below will show you how to enable highlighting in PDF using this tool:
Step 1: Launch Adobe Acrobat X on your computer.
Step 2: Go to File > select Open > choose the scanned PDF file.
Step 3: Once the scanned file opens, go to Tools > select Recognize Text > choose In This File. Select the Edit button if you would like to make some adjustments to your scanned document. The ClearScan is usually the most effective option for the process. Finally, click the OK button to initiate character recognition.

Step 4: Once the OCR process is complete, you should be able to highlight the PDF file. To do this, select the cursor tool on the toolbar, and then select the text you would like to highlight. Right-click on the selected text and then choose Highlight Text.
Step 5: To save the file, go to File > select Save.
Without OCR tool
It is still possible to mark up text in a scanned PDF without having to use the OCR tool. While the markup you end up getting is not perfect, this method can be useful when you need to single out certain sections of a scanned PDF file. Below, we will show you how to highlight text on a scanned PDF using Preview’s rectangle tool:
Step 1: Open the scanned PDF file in Preview.
Step 2: At the top of the page, click the Pen icon. This should give you the annotations toolbar.
Step 3: Go to the shapes sub-menu and click the dropdown arrow. This will give you several shapes – choose the Rectangle shape.
Step 4: Go to the Line Thickness sub-menu and select the first thickness option – this should be the thinnest option in the list.
Step 5: Go to the Color sub-menu and select your preferred color.
Step 6: To highlight a section of the scanned PDF file, simply place the cursor at the beginning, hold down the left mouse button and then drag the cursor over the preferred section. This should draw a rectangle around the section.
Note: If you would like to say something about the highlighted text, simply go to the Text box submenu and then choose a Thought Bubble, Speech Bubble, or the regular Text Box. Next, draw this next to the highlighted text and then type in your text.
Step 7: To save the highlighted document, go to File > select Save.
6. Highlight texts in locked PDF
As noted earlier, you can’t highlight a secured PDF. Most locked PDF files will deny you the ability to edit them. This means that the only thing that you can do is just view them.
The only way to enable highlighting on a secured PDF document is by using a password to unlock the file. If you know the person who locked the file, contact them, and request a password. If you get the password, follow the steps outlined below to unlock the file:
Step 1: Open the file in Acrobat.
Step 2: Go to File > Properties > Security.

Step 3: Choose No Security.
Step 4: You will be prompted to enter the password. After entering the password, save the PDF file and then close it.
Once you open the PDF document again, it won’t be locked. This means that you will have the ability to highlight it. Depending on the software you intend to use on your computer, you will simply need to follow the steps we have outlined above.
Conclusion
Whether you are reading an article, editing some drafts, or simply proofreading someone’s work, highlighting a PDF file can be helpful. In this guide, we have shown you how to highlight a PDF. Whether you are working on a Mac or Windows PC, the solutions listed in this article should work for you.
