Adobe Acrobat is too expensive for most people – for this reason, most people who work with PDF files search for more affordable alternatives. In this article, we will show you the alternatives you can use to make fillable PDF without Adobe Acrobat.
If you encounter problems while working with PDF files, it might be the result of a document being damaged or corrupted. In this case, the PDF Repair tool will be able to help you deal with most possible issues.
Method 1: Use Microsoft Word to Make a Fillable PDF
If you do have Microsoft Word 2010 and higher, you won’t need any additional tool to create fillable PDF documents. To make a fillable PDF without Adobe Acrobat, you will simply need to follow the steps below:
Step 1: Locate the Word file you would like to convert into a fillable PDF on your computer and open it. If you are yet to create the file, open Microsoft Word and then simply go to File > choose New.
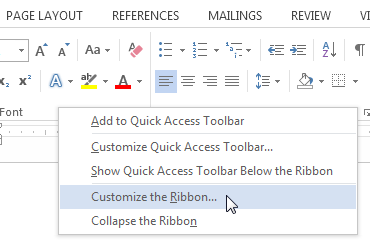
Step 2: Show the developer tab in Word by selecting File > Options > Customize Ribbon. Select the Developer tab to enable it and then hit the OK button.
Step 3: Type the text you would like to have on the fillable PDF file.
Step 4: For each item, you would like the users to enter some text, you will have to add some text control. To add the text control, you will need to visit the Developer tab > select Rich Text Content Control or Plain Text Content Control. Repeat for all the other fillable fields.
Step 5: To add a drop-down list or a combo box for any field that you would like to add multiple choices, you will simply need to select the Developer tab > click Drop-Down List Content Control or Combo Box Content Control. To customize the options available on the drop-down list or combo box, you will simply need to select Properties under the Developer tab.
Step 6: If you would like to have a checkbox on the fillable PDF file, you can add it by visiting the Developer tab > Check Box Content Control.
Step 7: Once you are done with customizing the document, you simply need to save it as a PDF file. To do this, visit File > Save As > give the file name > in the “Save as type” option, choose PDF > choose where to save the document and then hit the Save button.
Method 2: Use Google Docs
Google Docs is another free tool that you can use to make fillable PDF without Adobe Acrobat. To use this tool, all you will need is a Google account – if you do not have a Google account already, you can create one pretty quickly.
While Google Docs is quite similar to Microsoft Word, it does not offer much control over the process of making fillable PDF – this means that the fillable document you end up with may not look as sleek as the one you create using Microsoft Word. Below, we will show you how to make fillable PDF using Google Docs:
Step 1: On your computer web browser, visit https://drive.google.com/
Step 2: If you are not logged into your Google account, you will need to enter your Google email and password. If you do not have an account, simply select the Create Account option and follow the onscreen instructions.
Step 3: On Google Drive, click the New button > choose File Upload > select the PDF file you wish to make Fillable or editable.
Step 4: Once the file is uploaded to Google Drive, right-click on it > select Open with Google Docs and then give Google Drive a couple of seconds for it to process your document.
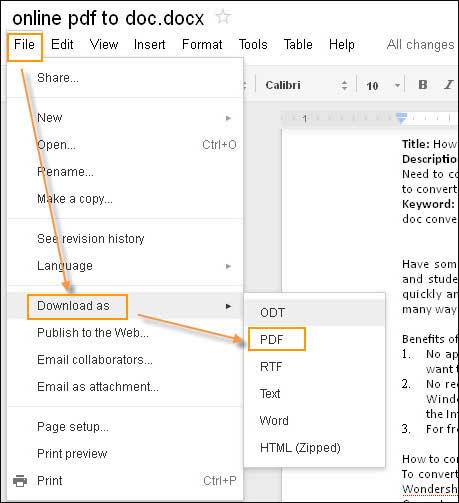
Step 5: Once the file opens in Google documents, click the File tab > choose Download As > select an ideal editable output format to save the document – for example, if you have Microsoft Word on your computer, choose the “Microsoft Word (.docx)” option.
Method 3: Create Fillable PDF Forms Online
This is another web-based tool that you can use to make a fillable PDF without Adobe Acrobat. The tool does allow its users to create the files for free if they use the Unregistered option – this option, however, denies you the ability to open the files you had worked with previously and continue with the editing where you had left it.
To enjoy the benefits of a registered user, you may need to pay $2.99/month subscription fees.
Below, we have the steps you will need to follow to create your fillable forms using PDFescape:
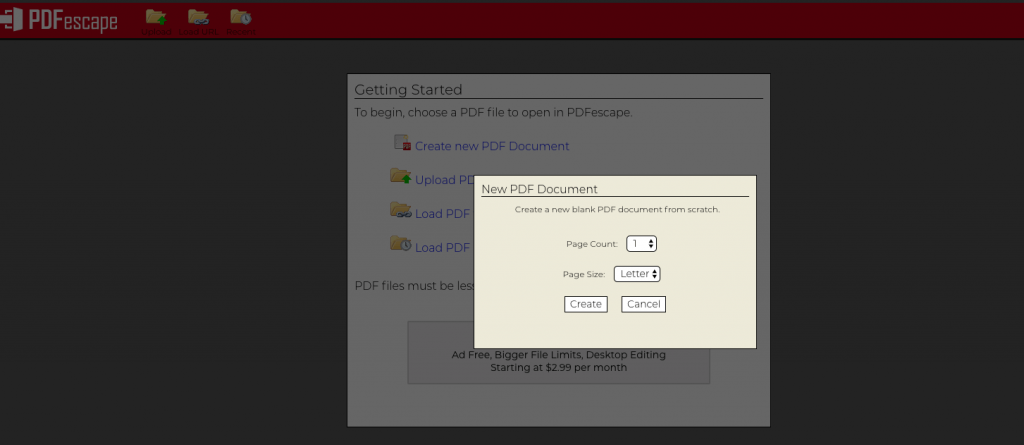
Step 1: Visit https://www.pdfescape.com/open/ via your computer’s web browser. Select “Create new PDF Document”. Select the Page Count, Page Size, and then hit the Create button.
Step 2: Under the Insert tab, you should find options which allow you to create your fillable form. Use the options and customize the fillable PDF to your liking.
Step 3: Once you are done, you can download the document to your computer.
Note: Why Online Editable PDF Creators Are Not the Best Option
While online PDF creators can do an impressive job for free, they have limitations that make them less ideal. These limitations include:
- They impose a lot of limitations – For example, most online tools will only allow you to work on PDF files featuring a specific size or number of pages.
- They lack privacy – When working on your fillable PDF online, you will be storing the document on a third-party server. This means that you cannot control who can view the files.
- They rely heavily on your internet connection – Without an internet connection, you cannot make fillable PDF files online. Also, if your connection is slow, you will waste too much of your time.
- Customization options are limited – This means that including all the options you want on the editable PDF file may not be possible.
- Some tools require your email address – The online tools will force you to enter your email address so that they can send you the fillable PDF file. This places you at the risk of receiving scam marketing emails.
The best way to avoid all these limitations is by making use of an offline PDF tool. Below, we will discuss offline tools you can use to make fillable PDF files.
Method 4: Use Paid Computer Programs to Make a Fillable PDF
If you do want to make fillable PDF without Adobe Acrobat regularly and you do not have Microsoft Word on your computer, you may want to invest in a tool to help you with the PDF file creation. While the tools we have outlined below will still require you to pay for them, they are much cheaper compared to Adobe Acrobat.
PDFelement Pro
This tool works on both macOS and Windows PC. The powerful editing tool allows you to modify the fillable forms to obtain a document that suits your needs. To use this tool, however, you will need to pay $129 for a lifetime license. This is much cheaper compared to paying $14.99 per month for Adobe Acrobat Pro.
To make fillable PDF without Adobe Acrobat using PDFelement Pro, you will need to follow the steps we have outlined below:
Step 1: Download and install PDFelement Pro on your macOS or Windows PC.
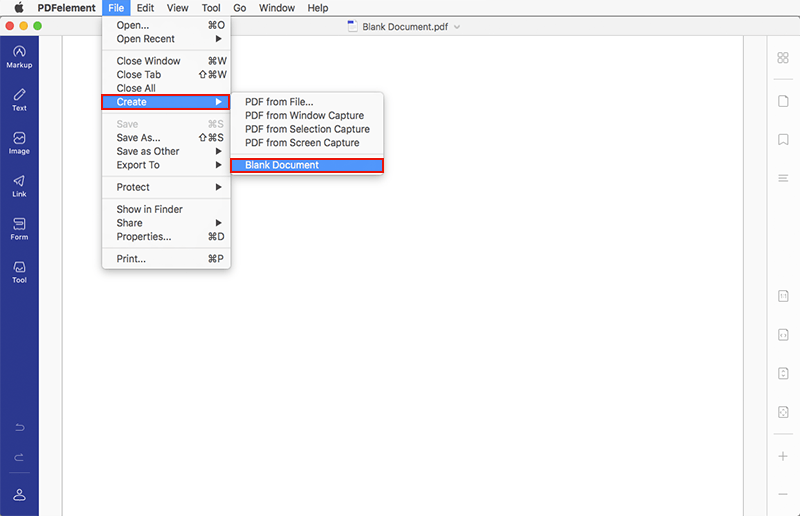
Step 2: After installing the tool, open it and then select File > Create > Blank Document.
Step 3: From the Form menu, create the fillable PDF file by selecting options like Text Field, CheckBox, Radio Button, List Box, etc. After adding all the needed elements, simply align them.
Step 4: After creating the fillable PDF, you can save it by visiting File > Save As > giving the document a name > hitting Save.
Method 5: Make PDF Fillable/Editable by Converting it to Word Using PDF WIZ
Most computer users have Microsoft Word installed on their computers – you can this program to fill out and edit your PDF files with ease. All you will have to do is convert the PDF files to Word. Converting the PDF to Word will give you control over all the text and fillable fields on the PDF file.
PDF WIZ makes the process of converting PDF to Word extremely easy. During the conversion process, PDF WIZ does not compromise the document’s quality – the output Word file will have the same quality as the input document.
PDF Wiz does not have any limitations when it comes to performing PDF conversions – the tool’s batch feature allows you to convert as many PDF files as you want in one go. To let you figure out whether PDF WIZ is an ideal solution for your PDF-related concerns, the team behind PDF WIZ lets you use all the tool’s features for free at first. With the free trial version, you get to decide whether upgrading to the paid version is worth it.
Below, we will show you how to convert PDF to Word in 3 simple steps:
Step 1: Download and install PDF WIZ on your computer. Launch the tool to proceed.
Step 2: On the home screen, click “Convert PDF to”. Drag and drop the PDF file you wish to make editable and then select “Word” under the document. Choose your preferred Word format and then select “Editability First” toward the right of “Convert Mode”.
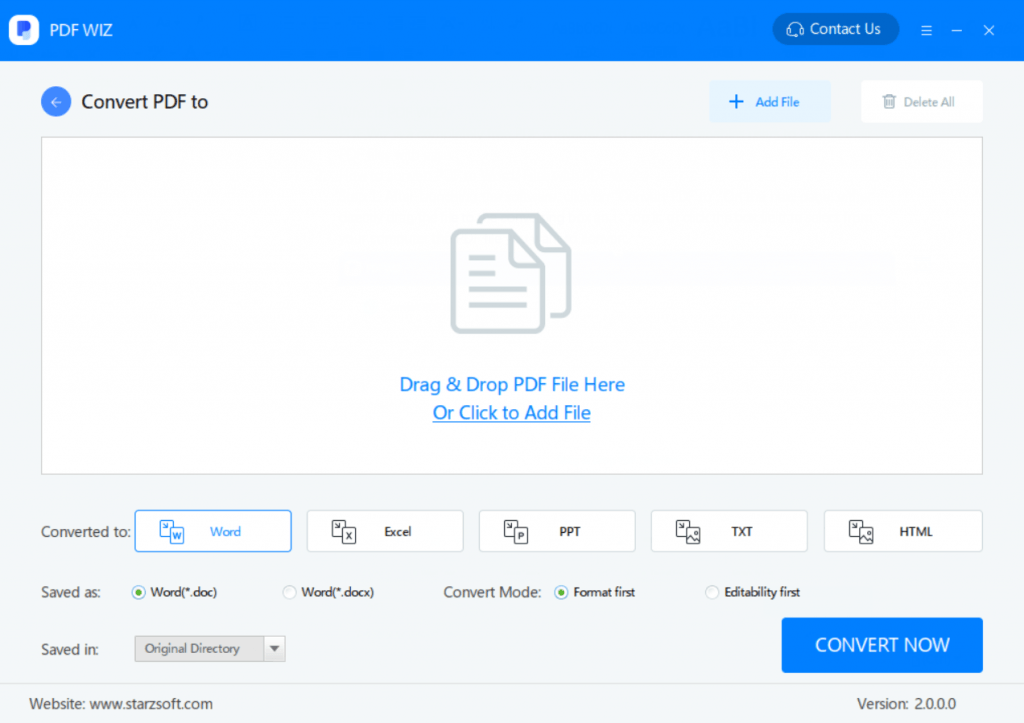
Step 3: Towards the right of “Saved in” select the folder where you wish to save the converted file. Finally, click CONVERT NOW. The converted document should be fully editable.
Note: PDF WIZ supports all PDF-related operations. In addition to offering conversion, you can use it to merge, compress, split, add/remove password, extract images, etc. PDF WIZ is the true definition of an “all-in-one” PDF tool.
Bonus Tip: How to Make PDF Fillable/Editable on Mac
The two methods outlined below will work exclusively on Mac computers. However, you can still use the methods outlined above on your macOS too – for example, the online methods will work on all operating systems.
Method 6: Use Quick Look
Quick Look is an ideal tool for opening previews of anything on Mac computers without the need to open the associated software. When Apple updated the macOS operating system to Mojave back in 2018, it added the ability to edit PDF files using Quick Look. While you can’t make fillable PDF from scratch using Quick Look, you can use the tool to fill/edit any PDF file:
Step 1: On your Mac computer, locate the PDF you wish to edit. Select the document and press the spacebar – a preview of the document will appear.
Step 2: Towards the top-right, click the pencil icon. This should give you editing tools – these include shapes, drawing tools, and a text tool (the text tool will be a T in a box).
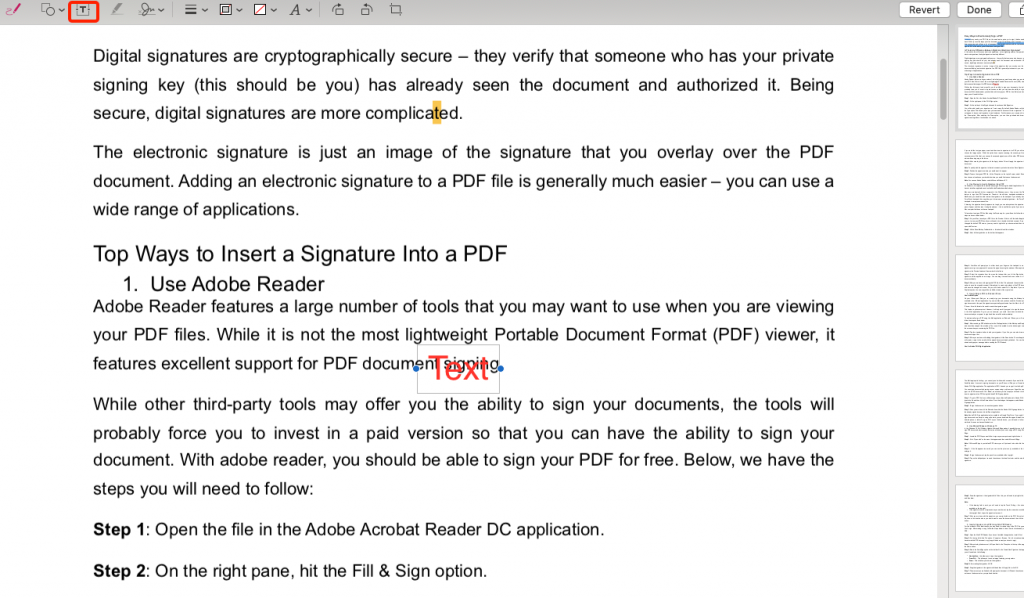
Step 3: Click on the text tool. Move the text box to the position where you wish to fill. Next, type in what you want to add to the PDF file.
Step 4: By default, the text will be red. To change the appearance, click the drop-down available beside the A – this will allow you to change the font, size, and text color.
Step 5: Once you are done with filling the PDF file, simply click Done to save your changes.
Method 7: Use Preview
If you are yet to update your macOS to Mojave, you can use the Preview app to make your PDF editable. The Preview app comes bundled with your Mac operating system. To use Preview to make PDF fillable without Adobe Acrobat, you will need to follow the steps below:
Step 1: Locate the PDF document on your Mac > right-click on it > choose Open with > Preview.
Step 2: Select Tools on the Preview menu > choose Annotate > click Text.
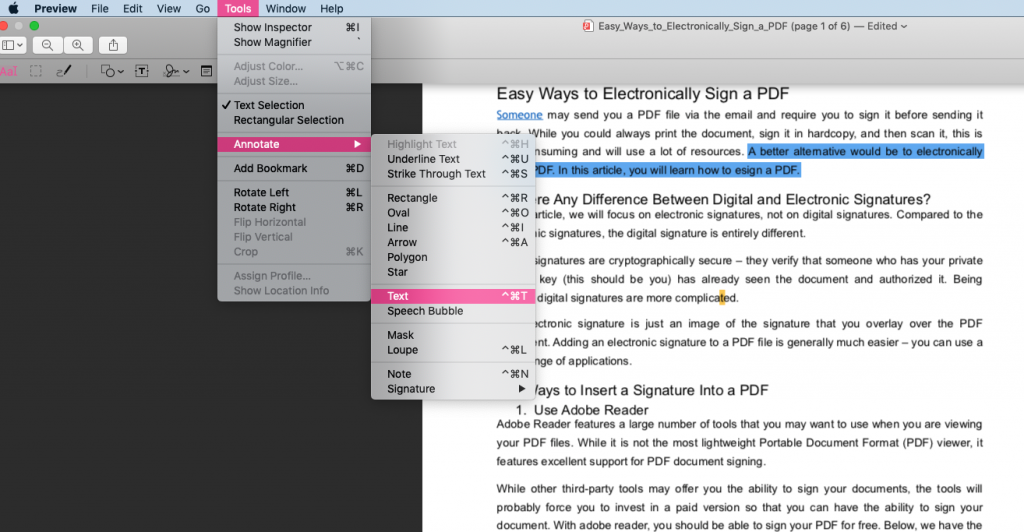
Step 3: A small box will appear with the word “Text” inside. Drag the box to where you wish to add text. You can also resize the box to fit the PDF layout. Once you are happy with the box’s location, starting typing the information you want to add.
Step 4: To change the color, size, or text font, click on the slanted A icon towards the far right of the toolbar. This should allow you to open a standard formatting option that allows you to make the text appearance suit your needs.
Summary
If you would like to make a fillable PDF document without having to invest in Adobe Acrobat, this article should help you find ideal alternatives. While some of the tools listed in this article do require their users to pay for licenses, the tools’ lifetime licenses are cheaper than having to pay $14.99 per month for Adobe Acrobat subscription. If you have a stable internet connection, you can avoid paying for desktop programs by making use of online tools.
