Downloading content and apps from the iTunes Store and App Store is usually a seamless action that takes seconds, but if you try to download something and are alerted that your Apple ID is disabled, it becomes a bothersome situation. The main problem is that if your Apple ID has been disabled, you’re going to be limited.
Apps can’t be downloaded, and you won’t be able to access any media that you have already bought until you fix it. This guide is going to cover the best solutions available to users which will give you the best chance of re-enabling your Apple ID.
Part 1. Quick Tips on Disabled Apple ID Fix
Upon encountering this error, you might just want to try a bunch of quick solutions. There are better methods, which we’ll cover shortly, but here are some quick tips to try which may remedy the issue.
- Check that your account’s billing info is up to date
- Contact Apple to find out if there is a specific reason for your Apple ID being disabled
- Use your account’s recovery key to sign back into the account
- Reset your password and sign in with the new account details
- Wait for 12-24 hours and try signing in again (this will reset the lockout timer)
- Try signing in to your Apple ID on another device or the iCloud dashboard
Part 2. FAQs About Disabled Apple ID
1Why is My Apple ID Disabled?
So when you see that your Apple ID has been disabled your first thought might be “Why am I seeing this?”. Without contacting Apple there is no way of finding out the reason specific to your account, but these are generally why it happens:
- Security concerns, such as a suspected account hack or signing in on unauthorized devices
- Attempting to sign in with the wrong account information too many times
- Billing errors due to outstanding payments and order disputes
- If an Apple account is inactive for a very long time then Apple may disable the account temporarily
2How to Know If Your Apple ID is Disabled?
Usually it’s obvious whether or not your Apple ID is disabled because they make it very clear when alerting you. Upon trying to sign in to the account, you’ll typically see a notification that looks like this:
- This Apple ID has been locked/disabled for security reasons
The wording might vary slightly but the point is clear: because of security concerns, the account has been disabled or locked.
Part 3. How to Fix Disabled Apple ID?
Now onto the important part, what can we do to fix this issue and enable an Apple ID that has been disabled? There are 4 solutions that we’d suggest for this scenario.
1Reset Password
First is the most obvious solution, and that is to reset your password. Since this is a security-related problem, resetting the account’s password is usually a sufficient way of resolving it and it’s also helpful for users who got locked out because of too many incorrect sign in attempts.
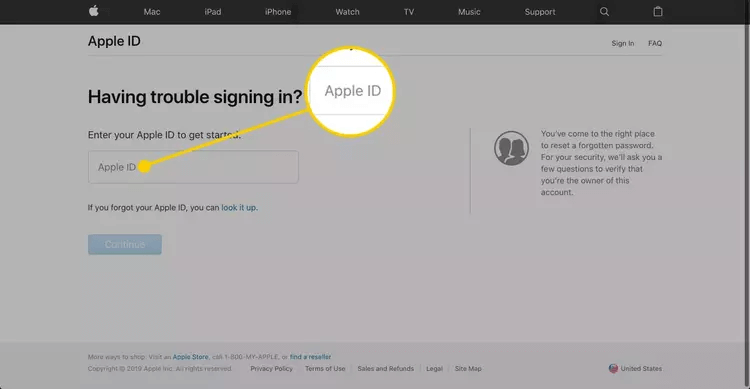
Step 1. Go to the iForgot page on Apple’s website and type your Apple ID (email address) into the box provided, and click Continue.
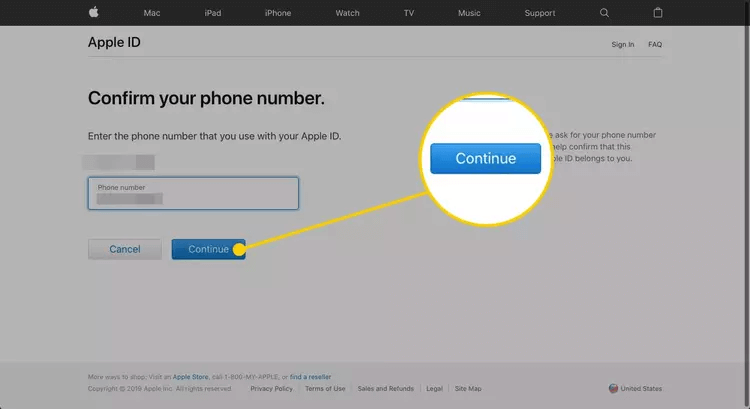
Step 2. Next, enter the phone number that is associated with your Apple ID and click Continue.
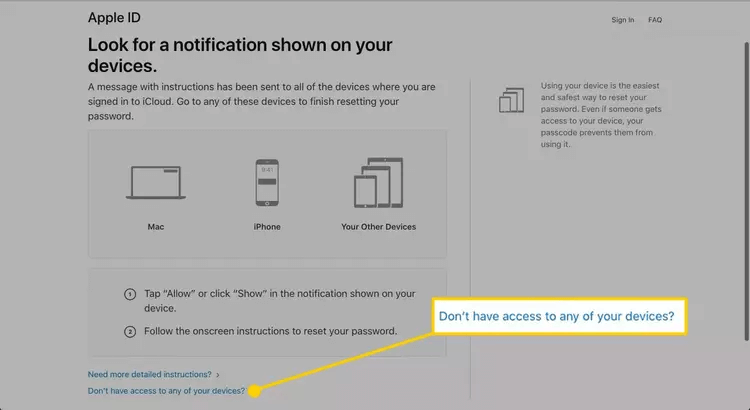
Step 3. Apple will then send a notification to each of the devices that are linked to the Apple ID you are resetting. Either use the notification to reset your password or click Don’t have access to any of your devices? and follow the instructions.
Step 4. After you finish resetting your password, try signing into your account again. You should now find that the account is no longer disabled.
When it comes to changing your account password there is also going to be the minor inconvenience of having to sign back into all of your devices again. However, if your Apple ID is inaccessible, this is the best thing you can do to address the issue.
2Third-Party Apple ID Unlock Software
One of our favourite solutions for getting rid of a disabled Apple ID is to use a third-party removal software, such as Tenorshare 4uKey. With this software we can effectively remove the account meaning that it won’t prohibit you any longer, and here are some features it comes with:
- Can be used to remove iOS lock screens and Apple IDs
- Removes passcodes, Touch ID, and Face ID lock screens from any iOS device
- Compatible with all of the most recent iOS versions and iOS device models
- Removes any Apple ID without the account password
- Available as a free version on both Windows and Mac computers
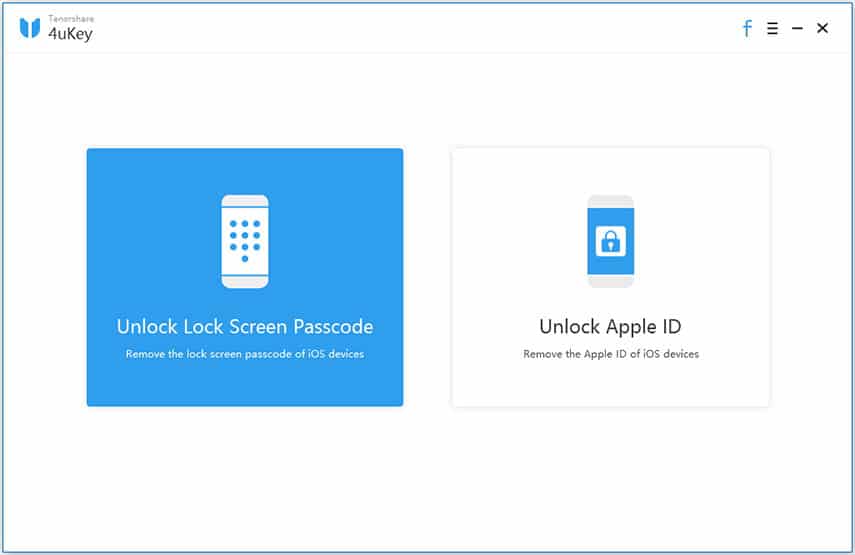
If this is the kind of tool that you think will help you get rid of a disabled Apple ID then keep reading, because the steps below will explain how to use this software.
Step 1. Download and install Tenorshare 4uKey on your computer, and launch the program.
Step 2. Click on the Unlock Apple ID method on the main menu then connect your iPhone using the lighting cable.
Step 3. On your device, a notification will appear, make sure that you tap Trust for this method. Click Start to proceed with the Apple ID removal.
Step 4. If Find My iPhone is enabled then you will be given instructions on doing a factory reset, otherwise the Apple ID removal will proceed instantly.
The main risk to using Tenorshare 4uKey is that if you are using Find My iPhone (which most users do use), then you’ll have to do a factory reset which wipes all of your data. That being said, if you are adamant about removing the disabled Apple ID, this is one of the only options you have. On the other hand, if you take regular backups, you can simply restore your data after the wipe!
3Contact Apple
If all else fails and you aren’t getting anywhere, try contacting Apple directly and asking for support regarding the disabled Apple ID.
While they may not be able to enable the account again for you, they may be able to offer some general support on what you can do to get back into the account. This may involve resetting the password, as we detailed earlier, but they might also be able to provide you with some insight into why the account has locked or disabled.
In cases where the account has unpaid iTunes orders or the payment was disputed, they will explain how to resolve the situation. This can be as simple as paying any outstanding payments and you’ll regain account access pretty quickly.
Bonus: How to Protect Your Apple ID from Hackers?
Given that the reason for most users encountering a disabled Apple ID is due to account security concerns, taking steps to protect your Apple ID from hackers is ideal. Here are some of the top things you can do:
Tip 1 Enable Two Factor Authentication and change your password if there are suspicious login attempts
This is an incredibly effective security measure that takes minutes to set up, and having it enabled will improve your account’s security while also minimising the risk of being hacked in the future.
- Step 1. On your iPhone, go to the Settings app and tap Your Name then Password & Security.
- Step 2. If Two Factor Authentication is off, then tap on Turn On Two Factor Authentication.
- Step 3. Tap Continue and you’ll then have to enter the phone number where your two-factor authentication codes will be sent to.
- Step 4. After entering a phone number and choosing a method, tap Next and you’ll receive a test code to confirm the correct number has been used.
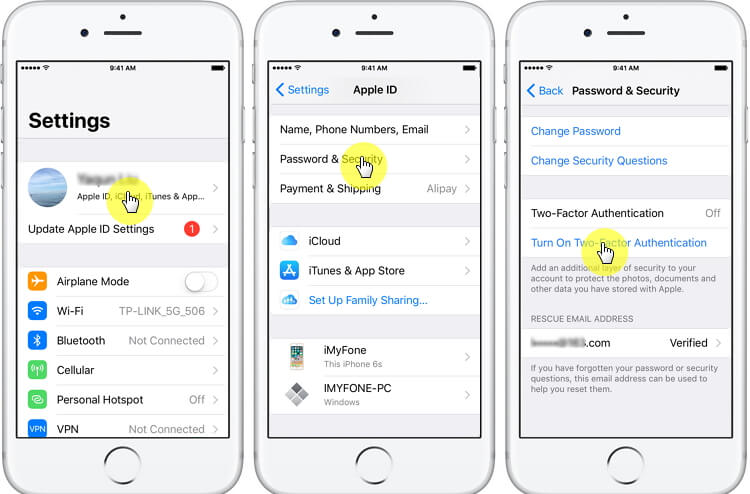
Alternatively, if you have a Mac computer then you can enable two-factor authentication through the System Preferences menu and by following similar steps to those above. Considering the benefits to this security feature there’s no reason for users not to start using it.
Tip 2 Do not open or respond to suspicious emails that could be phishing emails (you can spot these emails because they are sent from strange email addresses and have bad grammar)
Tip 3 Never share your password with anyone and don’t sign in with your Apple ID on any third-party websites
Tip 4 User a strong password that can’t be easily hacked by brute-forcing tools
Conclusion
That brings our guide on how to deal with a disabled Apple ID to an end and hopefully, with these methods, you’ll be able to unlock your account without too much hassle.
At the very least, you’ll be able to remove the problematic Apple ID from your device using Tenorshare 4uKey and then sign in with a different account. Since a disabled account is very limiting (e.g. it prevents the majority of iCloud features), this is a problem you’ll want to resolve quickly and all of the solutions we’ve gone over will help to do exactly that.
