Is your iCloud locked, and not having the password to unlock is a problem? Want to purchase iMyFone iBypasser but don’t know if it work for you?
This article is based on a complete review of iMyFone iBypasser. Let us move forward and get the job done.
Part 1: iMyFone iBypasser Full Review
iMyFone iBypasser is designed to help users to unlock iCloud locked iPhone. For users who do not have the sign-in information of the iCloud account and wish to use their account to take advantage of all iCloud functionality, this program is useful.
1How does it work?
iMyFone iBypasser is a technical software that begins its work by jailbreaking the connected device to get full access to the iOS system. After that, it can edit the relevant iCloud modules to bypass the iCloud lock.
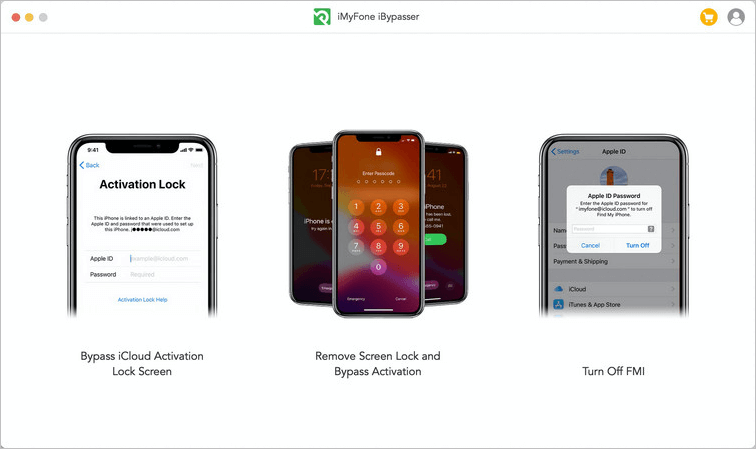
Once the iBypasser is done with changes to those modules, then the lock will be bypassed. This process may be very easy for some users. If you cannot do so, don’t worry. Let us move forward and resolve your query.
2Is it safe to use?
Although iMyFone iBypasser is not always 100% safe, still, this software is reliable. It assures the security of your data. However, when we jailbreak our device, it may cause danger to your device. Take a look at a few drawbacks of jailbreaking:
- Inability to Apply Future Software Updates
- You may brick your iPhone (maybe you can’t operate it further)
- The phone’s warranty ends.
- Might trigger security problems
- The app may install other software that is not trustworthy.
So, though jailbreaking can be an exciting choice because you can install a lot more fun applications that are not in the app store, be careful; these threats are still there.
3Does it work?
Yes, we tested it, and it worked successfully. We used iPhone 8 and iPad Pro (2017) to bypass the lock. The phone was unlocked as expected. Still, there are some cons to this method:
- Your device locked again after reset, not forever.
- Phone call feature does not operate (income, outgoing, face time)
- Cellular is unable to function.
- After bypass, you will not be able to enjoy Apple ID (iCloud account) functionality.
- Only partial iOS devices are supported.
4Is it free to use?
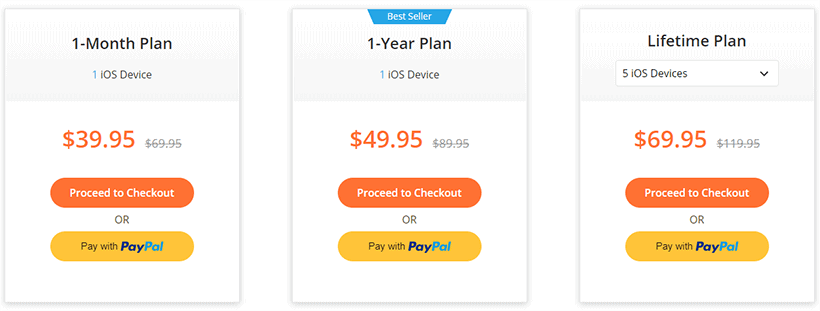
No, not really. This software is not free, and there is no crack for this, like others. Moreover, if you find its crack, keep in mind that you are installing a virus. Do not take a risk in this case.
5Overview
iMyFone iBypasser bypass activation lock due to jailbreaking. Unfortunately, some of your iPhone’s functions cannot work after this process. You May need the fee alternatives when trying to bypass iCloud lock.
Part 3: Free Alternatives of iMyFone iBypasser
1iCloud DNS Bypass
An authentication request is sent from the system to the Apple Server when you set up a new iPhone or reset it after a factory reset. Apple will respond to requests for activation and verify the iPhone’s status. The iCloud Activation Lock screen displayed if Find My iPhone is activated on the system. Then you will need to have authentication information for your iCloud account (username/email and password).
You may use iCloud DNS Bypass to avoid this stage by moving the activation route from an Apple server to another DNS server for authentication. You can do so if you have forgotten your Apple ID/password or purchased a used iPhone, which is iCloud-locked.
Therefore, without having to log in to iCloud, you can enjoy some functionality of the system.
The Benefits of iCloud DNS Bypass
iCloud DNS bypass is not as difficult as it looks, and below are some of the advantages of iCloud DNS Bypass:
- No need to install any software.
- Once DNS activates the device, you can access it and then use some apps.
- It is free to use.
Limitation of iCloud DNS Bypass
While this technique is quick and effective, it still has some limitations, such as:
- The iCloud DNS Bypass will not be permanently unlocked.
- This approach would not allow you to access all the functionality on your iPhone. You can only use limited functions.
- It does not function on all iOS devices, and it is only suitable for iOS 8 and iOS 10 devices.
Steps to Bypass iCloud Activation Lock via DNS
You can bypass Activation Lock on your iPhone with the iCloud DNS Server. The process is very easy, and no special knowledge is needed. However, to complete the process of activation, you need to put a SIM card on your iPhone.
Step 1: Go through the method of configuration and select your country & language.
Step 2: Link to a Wi-Fi network on the Wi-Fi configuration page, and you can see the “I” symbol inside the Wi-Fi network. If not, press the Home button and choose the ‘More Wi-Fi Settings’ option.
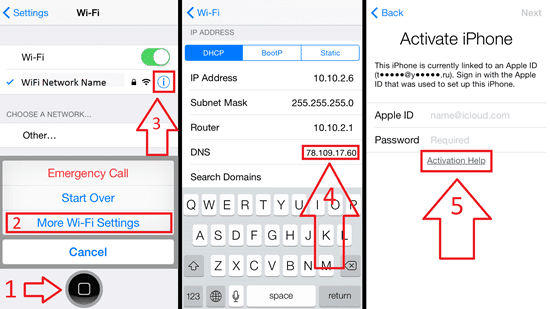
Step 3: Now go to the settings for the Wi-Fi link and click on “Forget This Network”. You can find the option to reach a DNS server by clicking on the “I” symbol. Select and add an IP address according to your position from the list below:
- America: 104.154.51.7
- South America: 35.199.88.219
- Asia: 104.155.220.58
- Europe: 104.155.28.90
- Australia and Oceania: 35.189.47.23
- Other continents: 78.100.17.60
Step 4: After that, in the upper left, click on the Back option, then select your Wi-Fi network from the list provided and enter your password. Click on “Back” instead of “Next.” to go on the iCloud Bypass screen.
Step 5: You can enjoy the specific features of the device after the iCloud Activation Lock is bypassed. You can use the camera and play games, etc.
2Enter the Passcode to Bypass
You can switch off Activation Lock with your device security code if you have iOS 11 or later, and your account is secured with two-factor authentication. Tap "Unlock with Passcode" and then enter the passcode to unlock your device.
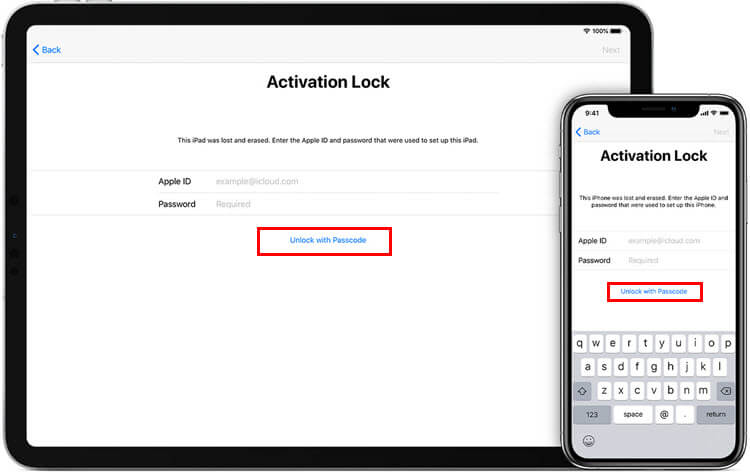
Whether you ordered the device from someone else, be sure that the device has been removed and is no longer connected to the previous owner’s account until you purchase an iPhone, iPad, or iPod touch from someone other than Apple or an authorized Apple reseller. See if Activation Lock also protects an Apple Watch or a Mac.
3Request for Support from the Previous Owner
Request them to enter their Apple ID and password on the Activation Lock screen and delete the device from their account if the device is connected to the previous owner’s account, and they are nearby.
If you have no access to its previous owner, try to contact them and request them to follow the following steps:
Step 1: Sign in to iCloud.com with their Apple ID.
Step 2: Go to Find iPhone.
Step 3: Click on “All Devices”, which is at the top of the page.
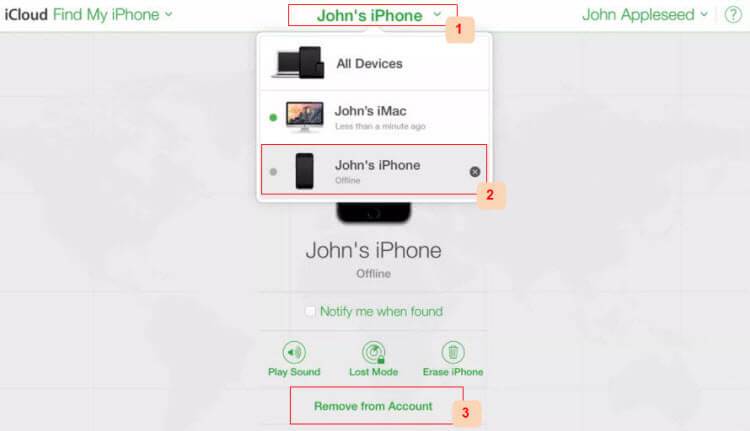
Step 4: Select the device that you want to remove from iCloud.
Step 5: Click Remove from Account.
Once the device is removed from their account, turn off your device and again turn it on to start the process.
Conclusion
We have represented a few options for you in this review. Now you have to decide; you want to use iMyFone iBypasser or want to go with freeways like iCloud DNS bypass. We have covered almost all the pros and cons of both.
Although it is a very simple process to use iMyFone iBypasser, it’s not free and you still can’t enjoy all features & functions of your device. If you want a free way, then iCloud DNS bypass will be a good option.
Another technique discussed here is “Ask your previous owner for help” if you bought a second-hand iPhone. This is the safest and easiest way so far. Choose the one that suits you more!
